近期折腾一个边缘计算设备,到手之前已经提前安装了TensorFlow。具体的配置如下:
| CPU | Intel Apollo Lake | 4核2.2Ghz |
| 内存 | LPDDR4内存 | 4GB |
| 存储 | 板载eMMC Flash | 32GB |
| AI加速卡 | Intel Movidius | MA2485芯片 |
打开终端,输入python3,导入TensorFlow:
import tensorflow发现出现以下错误:
Illegal instruction (core dumped)这说明在什么都没开始之前TensorFlow已经崩溃了,网上查了一下说可能是因为对应的CPU不不支持AVX指令优化。从TensorFlow1.6开始,预编译的TensorFlow二进制文件使用AVX指令—一种加速向量运算的指令集。官方文档有以下说明:
注意:从 TensorFlow 1.6 开始,二进制文件使用 AVX 指令,这些指令可能无法在旧版 CPU 上运行。
我们在ubuntu系统上确认一下,终端输入:
lscpu可以看到如下信息:
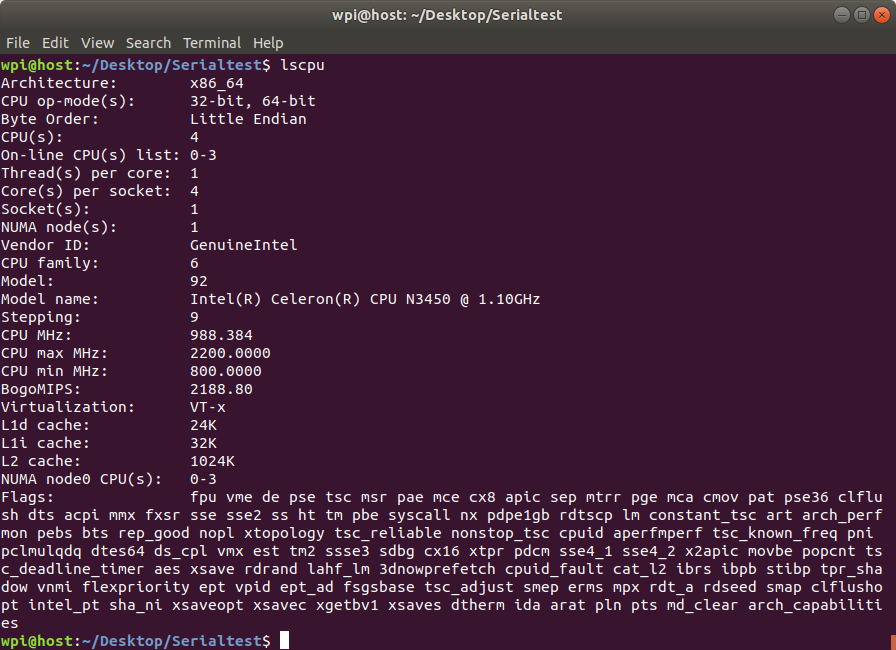
于是我们了解到该CPU是x86-64架构,下面的Flags说明不支持AVX指令,这个问题有两个解决方法,一是把TensorFlow降级到1.5版本,另一个是自己手动编译安装TensorFlow。
一、降级TensorFlow版本
降级版本很简单,如果你不在乎高版本Tensorflow的特性以及其他软件的兼容性的话,通过以下命令就可以完成:
步骤1:卸载当前安装的Tensorflow模块
pip3 uninstall tensorflow步骤2:安装TensorFlow1.5
pip3 install tensorflow==1.5步骤3:运行TensorFlow验证是否还出现错误
python3 -c "import tensorflow as tf; print(tf.__version__)"上面也是快速安装其他版本TensorFlow的方法。事实上,运行老版本是一个治标不治本的方法,说不定后面又出现新的问题,所以最好还是手动编译安装最新的TensorFlow。
二、手动编译安装Tensorflow
1、确认自己的系统环境
这里我主要记录在Ubuntu上编译安装的过程,如果是其他的系统,请参考官方文档。我用的系统是Ubuntu18.04,python3.6,gcc7.4.0。可以通过以下一些命令查看相关信息:
uname -a
cat /proc/version
lsb_release -a
python3 --version
gcc --version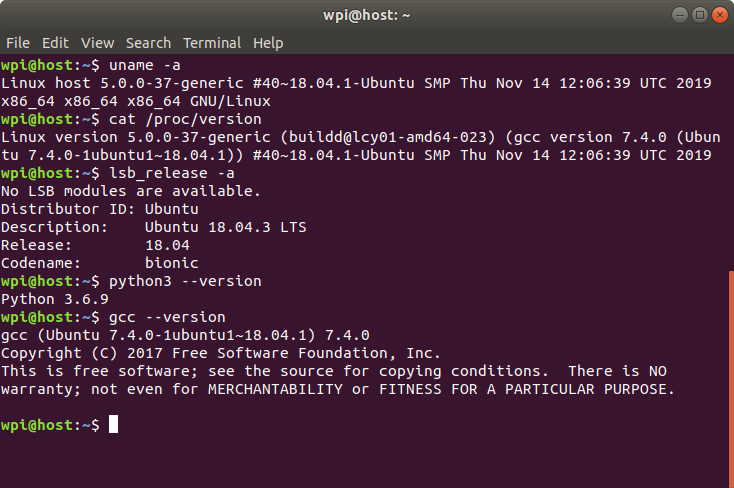
然后安装Python和Tensorflow软件包依赖项,一般已经安装好了:
sudo apt install python3-dev python3-pip安装TensorFlow pip软件包依赖项(如果使用虚拟环境或者想要全局安装,省略–user参数,–user参数会将软件包安装在$HOME/.local路径下,其中包含三个子文件夹bin,lib和share,这样的话安装就不需要root权限):
pip3 install -U --user pip six numpy wheel setuptools mock future>=0.17.1
pip3 install -U --user keras_applications==1.0.6 --no-deps
pip3 install -U --user keras_preprocessing==1.0.5 --no-deps
如果使用了–user参数,那么需要查看一下.profile文件确认用户个人目录是否在环境变量中:
cat ~/.profile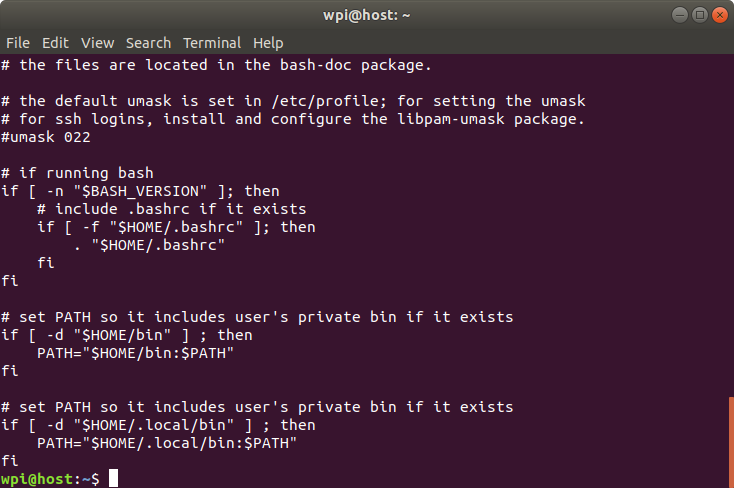
2、安装Bazel
Bazel有两种安装方法,一是使用自定义的APT仓库,二是使用二进制安装器。
但是第一种方法默认安装最新版的Bazel,相对于我们的Tensorflow版本太高,不兼容,而指定具体版本的时候我的系统又搜索不到匹配的安装包,所以这里我选择使用二进制安装器来安装。对于Tensorflow1.14而言,bazel0.26.0版本是适合的,所以这里我下载的是这个版本:
步骤1:安装需要的软件包
sudo apt install g++ unzip zip步骤2:运行安装器
到这个网站可以下载bazel-0.26.0-installer-linux-x86_64.sh,运行以下命令:
chmod +x bazel-<version>-installer-linux-x86_64.sh
./bazel-<version>-installer-linux-x86_64.sh --user
–user标志会把Bazel安装到$HOME/bin目录,从上面看来这个路径已经被添加到环境变量了。当然也可以不加–user标志,如果该目录没有被添加到环境变量中,可以使用命令:
export PATH="$PATH:$HOME/bin"或者编辑~/.bashrc文件,使其永久生效。
安装成功后,会显示相关信息。
步骤3(可选):安装支持GPU版本
由于我们不使用GPU,所以这里不安装。
步骤4:下载TensorFlow源代码
Git克隆代码库
git clone https://github.com/tensorflow/tensorflow.git
cd tensorflow
代码库默认为master开发分支,我们需要切换到对应的版本分支,这里选择r1.14:
git checkout r1.14这里很有可能出现下载速度十分缓慢的情况,可能是DNS解析的问题,我们可以在hosts文件里直接添加github的ip地址,另外可以设置代理,实在不行的话直接登陆网页手动下载某个分支的zip包,或者是把链接复制到码云再下载。
步骤5:配置编译系统
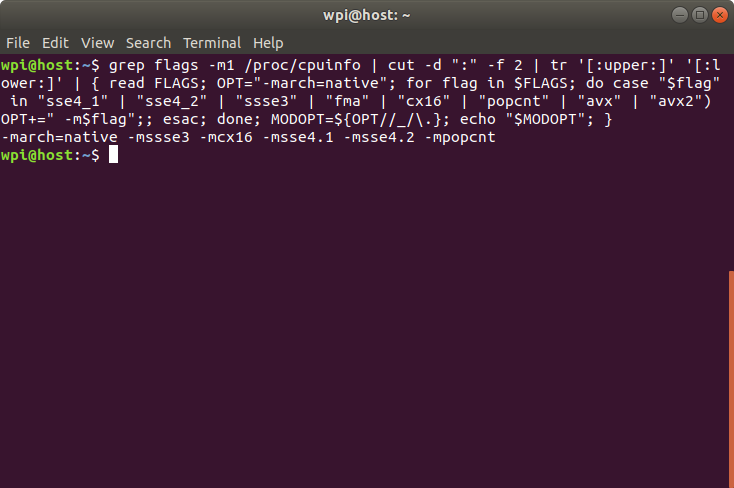
在配置之前我们先获得优化标志,终端输入以下命令:
grep flags -m1 /proc/cpuinfo | cut -d ":" -f 2 | tr '[:upper:]' '[:lower:]' | { read FLAGS; OPT="-march=native"; for flag in $FLAGS; do case "$flag" in "sse4_1" | "sse4_2" | "ssse3" | "fma" | "cx16" | "popcnt" | "avx" | "avx2") OPT+=" -m$flag";; esac; done; MODOPT=${OPT//_/\.}; echo "$MODOPT"; }回车会显示优化标志,等会需要把它复制到配置选项中。
接着开始配置:
./configure下面是一个别人的示例运行会话,具体内容可能有所不同:
You have bazel 0.15.0 installed.
Please specify the location of python. [Default is /usr/bin/python]: /usr/bin/python2.7

Found possible Python library paths:
    /usr/local/lib/python2.7/dist-packages
    /usr/lib/python2.7/dist-packages
Please input the desired Python library path to use.  Default is [/usr/lib/python2.7/dist-packages]

Do you wish to build TensorFlow with jemalloc as malloc support? [Y/n]:
jemalloc as malloc support will be enabled for TensorFlow.

Do you wish to build TensorFlow with Google Cloud Platform support? [Y/n]:
Google Cloud Platform support will be enabled for TensorFlow.

Do you wish to build TensorFlow with Hadoop File System support? [Y/n]:
Hadoop File System support will be enabled for TensorFlow.

Do you wish to build TensorFlow with Amazon AWS Platform support? [Y/n]:
Amazon AWS Platform support will be enabled for TensorFlow.

Do you wish to build TensorFlow with Apache Kafka Platform support? [Y/n]:
Apache Kafka Platform support will be enabled for TensorFlow.

Do you wish to build TensorFlow with XLA JIT support? [y/N]:
No XLA JIT support will be enabled for TensorFlow.

Do you wish to build TensorFlow with GDR support? [y/N]:
No GDR support will be enabled for TensorFlow.

Do you wish to build TensorFlow with VERBS support? [y/N]:
No VERBS support will be enabled for TensorFlow.

Do you wish to build TensorFlow with OpenCL SYCL support? [y/N]:
No OpenCL SYCL support will be enabled for TensorFlow.

Do you wish to build TensorFlow with CUDA support? [y/N]: Y
CUDA support will be enabled for TensorFlow.

Please specify the CUDA SDK version you want to use. [Leave empty to default to CUDA 9.0]: 9.0

Please specify the location where CUDA 9.0 toolkit is installed. Refer to README.md for more details. [Default is /usr/local/cuda]:

Please specify the cuDNN version you want to use. [Leave empty to default to cuDNN 7.0]: 7.0

Please specify the location where cuDNN 7 library is installed. Refer to README.md for more details. [Default is /usr/local/cuda]:

Do you wish to build TensorFlow with TensorRT support? [y/N]:
No TensorRT support will be enabled for TensorFlow.

Please specify the NCCL version you want to use. If NCLL 2.2 is not installed, then you can use version 1.3 that can be fetched automatically but it may have worse performance with multiple GPUs. [Default is 2.2]: 1.3

Please specify a list of comma-separated Cuda compute capabilities you want to build with.
You can find the compute capability of your device at: https://developer.nvidia.com/cuda-gpus.
Please note that each additional compute capability significantly increases your
build time and binary size. [Default is: 3.5,7.0] 6.1

Do you want to use clang as CUDA compiler? [y/N]:
nvcc will be used as CUDA compiler.

Please specify which gcc should be used by nvcc as the host compiler. [Default is /usr/bin/gcc]:

Do you wish to build TensorFlow with MPI support? [y/N]:
No MPI support will be enabled for TensorFlow.

Please specify optimization flags to use during compilation when bazel option "--config=opt" is specified [Default is -march=native]:

Would you like to interactively configure ./WORKSPACE for Android builds? [y/N]:
Not configuring the WORKSPACE for Android builds.

Preconfigured Bazel build configs. You can use any of the below by adding "--config=<>" to your build command. See tools/bazel.rc for more details.
    --config=mkl            # Build with MKL support.
    --config=monolithic     # Config for mostly static monolithic build.
Configuration finished
注意这里大写的Y表明默认是Yes,大写的N表明默认是No。上面的配置需要根据自己的情况选择,比较重要的就是两个Python的路径,我使用的是/usr/bin/python3和/usr/local/lib/python3.6/dist-packages,不使用GPU的话选择不支持CUDA等。
对于编译优化标志,默认值 (-march=native) 会优化针对计算机的 CPU 类型生成的代码,针对特定的CPU,我们可能需要不同的设置,这里我的是:
-march=native -mssse3 -mcx16 -msse4.1 -msse4.2 -mpopcnt(可选)也可以将一些预先配置好的编译配置添加到 bazel build 命令中,例如:
- –config=mkl – 支持Intel® MKL-DNN
- –config=monolithic – 此配置适用于基本保持静态的单体编译系统
- –config=v2 – 编译 TensorFlow 2.x,而不是 TensorFlow 1.x
步骤6:编译pip软件包
使用Bazel构建仅支持CPU的TensorFlow软件包编译器:
bazel build --config=opt //tensorflow/tools/pip_package:build_pip_package(可选)如果要支持GPU:
bazel build --config=opt --config=cuda //tensorflow/tools/pip_package:build_pip_package上面的命令默认同时编译4个任务,这是会消耗大量内存的,如果出现内存不够的错误的话,使用以下配置命令限制Bazel的内存消耗量:
--local_ram_resources=2048如果还出现虚拟内存不够的错误的话,可以使用以下配置命令只开启一个编译任务,虽然这样的话可能会编译的很慢:
--jobs=1官方TensorFlow软件包是使用GCC 4编译的,并使用旧版ABI。对于GCC 5及更高版本,为了使您的编译系统与旧版ABI兼容,请使用:
--cxxopt="-D_GLIBCXX_USE_CXX11_ABI=0"兼容 ABI可确保针对官方TensorFlow pip软件包编译的自定义操作继续支持使用GCC 5编译的软件包。综上,我们的编译命令是:
bazel build --config=opt --local_ram_resources=2048 --cxxopt="-D_GLIBCXX_USE_CXX11_ABI=0" --jobs=1 //tensorflow/tools/pip_package:build_pip_package不出意外的话应该可以编译成功,这里注意的是编译时也会下载一些文件,如果网络不好的话还是需要科学上网。
步骤7:编译安装包
bazel build命令会创建一个名为build_pip_package的可执行文件,此文件是用于编译pip软件包的程序。请如下所示地运行该可执行文件,以在/tmp/tensorflow_pkg目录中编译.whl 软件包。当然,自己可以通过修改/tmp/tensorflow_pkg指定输出目录。
./bazel-bin/tensorflow/tools/pip_package/build_pip_package /tmp/tensorflow_pkg(可选)要从master编译,请使用–nightly_flag获取正确的依赖项:
./bazel-bin/tensorflow/tools/pip_package/build_pip_package --nightly_flag /tmp/tensorflow_pkg尽管可以在同一个源代码树下编译CUDA和非CUDA配置,但官方建议在同一个源代码树中的这两种配置之间切换时运行bazel clean。
步骤8:安装软件包
生成的.whl文件的名字取决于TensorFlow版本和平台,然后,使用pip3 install安装软件包:
pip3 install /tmp/tensorflow_pkg/tensorflow-version-tags.whl至此等待安装成功。
留言