通过上一节课的学习,我们了解了 Spring 事务的原理,并解决了几个常见的问题。这节课我们将继续讨论事务中的另外两个问题,一个是关于事务的传播机制,另一个是关于多数据源的切换问题,通过这两个问题,你可以更加深入地了解 Spring 事务的核心机制。
案例 1:嵌套事务回滚错误
上一节课我们完成了学生注册功能,假设我们需要对这个功能继续进行扩展,当学生注册完成后,需要给这个学生登记一门英语必修课,并更新这门课的登记学生数。为此,我添加了两个表。
- 课程表 course,记录课程名称和注册的学生数。
CREATE TABLE `course` (
  `id` int(11) NOT NULL AUTO_INCREMENT,
  `course_name` varchar(64) DEFAULT NULL,
  `number` int(11) DEFAULT NULL,
  PRIMARY KEY (`id`)
) ENGINE=InnoDB DEFAULT CHARSET=utf8;- 学生选课表 student_course,记录学生表 student 和课程表 course 之间的多对多关联。
CREATE TABLE `student_course` (
  `student_id` int(11) NOT NULL,
  `course_id` int(11) NOT NULL
) ENGINE=InnoDB DEFAULT CHARSET=utf8;
同时我为课程表初始化了一条课程信息,id = 1,course_name = "英语",number = 0。
接下来我们完成用户的相关操作,主要包括两部分。
- 新增学生选课记录
@Mapper
public interface StudentCourseMapper {
    @Insert("INSERT INTO `student_course`(`student_id`, `course_id`) VALUES (#{studentId}, #{courseId})")
    void saveStudentCourse(@Param("studentId") Integer studentId, @Param("courseId") Integer courseId);
}- 课程登记学生数 + 1
@Mapper
public interface CourseMapper {
    @Update("update `course` set number = number + 1 where id = #{id}")
    void addCourseNumber(int courseId);
}
我们增加了一个新的业务类 CourseService,用于实现相关业务逻辑。分别调用了上述两个方法来保存学生与课程的关联关系,并给课程注册人数 +1。最后,别忘了给这个方法加上事务注解。
@Service
public class CourseService {
    @Autowired
    private CourseMapper courseMapper;
    @Autowired
    private StudentCourseMapper studentCourseMapper;
    //注意这个方法标记了“Transactional”
    @Transactional(rollbackFor = Exception.class)
    public void regCourse(int studentId) throws Exception {
        studentCourseMapper.saveStudentCourse(studentId, 1);
        courseMapper.addCourseNumber(1);
    }
}
我们在之前的 StudentService.saveStudent() 中调用了 regCourse(),实现了完整的业务逻辑。为了避免注册课程的业务异常导致学生信息无法保存,在这里 catch 了注册课程方法中抛出的异常。我们希望的结果是,当注册课程发生错误时,只回滚注册课程部分,保证学生信息依然正常。
@Service
public class StudentService {
  //省略非关键代码
  @Transactional(rollbackFor = Exception.class)
  public void saveStudent(String realname) throws Exception {
      Student student = new Student();
      student.setRealname(realname);
      studentService.doSaveStudent(student);
      try {
          courseService.regCourse(student.getId());
      } catch (Exception e) {
          e.printStackTrace();
      }
  }
  //省略非关键代码
}
为了验证异常是否符合预期,我们在 regCourse() 里抛出了一个注册失败的异常:
@Transactional(rollbackFor = Exception.class)
public void regCourse(int studentId) throws Exception {
    studentCourseMapper.saveStudentCourse(studentId, 1);
    courseMapper.addCourseNumber(1);
    throw new Exception("注册失败");
}
运行一下这段代码,在控制台里我们看到了以下提示信息:
java.lang.Exception: 注册失败
  at com.spring.puzzle.others.transaction.example3.CourseService.regCourse(CourseService.java:22)
//......省略非关键代码.....
Exception in thread "main" org.springframework.transaction.UnexpectedRollbackException: Transaction rolled back because it has been marked as rollback-only
  at org.springframework.transaction.support.AbstractPlatformTransactionManager.processRollback(AbstractPlatformTransactionManager.java:873)
  at org.springframework.transaction.support.AbstractPlatformTransactionManager.commit(AbstractPlatformTransactionManager.java:710)
  at org.springframework.transaction.interceptor.TransactionAspectSupport.commitTransactionAfterReturning(TransactionAspectSupport.java:533)
  at org.springframework.transaction.interceptor.TransactionAspectSupport.invokeWithinTransaction(TransactionAspectSupport.java:304)
  at org.springframework.transaction.interceptor.TransactionInterceptor.invoke(TransactionInterceptor.java:98)
  at org.springframework.aop.framework.ReflectiveMethodInvocation.proceed(ReflectiveMethodInvocation.java:186)
  at org.springframework.aop.framework.CglibAopProxy$DynamicAdvisedInterceptor.intercept(CglibAopProxy.java:688)
  at com.spring.puzzle.others.transaction.example3.StudentService$$EnhancerBySpringCGLIB$$50cda404.saveStudent(<generated>)
  at com.spring.puzzle.others.transaction.example3.AppConfig.main(AppConfig.java:22)
其中,注册失败部分的异常符合预期,但是后面又多了一个这样的错误提示:Transaction rolled back because it has been marked as rollback-only。
最后的结果是,学生和选课的信息都被回滚了,显然这并不符合我们的预期。我们期待的结果是即便内部事务 regCourse() 发生异常,外部事务 saveStudent() 俘获该异常后,内部事务应自行回滚,不影响外部事务。那么这是什么原因造成的呢?我们需要研究一下 Spring 的源码,来找找答案。
案例解析
在做进一步的解析之前,我们可以先通过伪代码把整个事务的结构梳理一下:
  // 外层事务
  @Transactional(rollbackFor = Exception.class)
  public void saveStudent(String realname) throws Exception {
      //......省略逻辑代码.....
      studentService.doSaveStudent(student);
      try {
        // 嵌套的内层事务
        @Transactional(rollbackFor = Exception.class)
        public void regCourse(int studentId) throws Exception {
          //......省略逻辑代码.....
        }
      } catch (Exception e) {
          e.printStackTrace();
      }
  }
可以看出来,整个业务是包含了 2 层事务,外层的 saveStudent() 的事务和内层的 regCourse() 事务。
在 Spring 声明式的事务处理中,有一个属性 propagation,表示打算对这些方法怎么使用事务,即一个带事务的方法调用了另一个带事务的方法,被调用的方法它怎么处理自己事务和调用方法事务之间的关系。
其中 propagation 有 7 种配置:REQUIRED、SUPPORTS、MANDATORY、REQUIRES_NEW、NOT_SUPPORTED、NEVER、NESTED。默认是 REQUIRED,它的含义是:如果本来有事务,则加入该事务,如果没有事务,则创建新的事务。
结合我们的伪代码示例,因为在 saveStudent() 上声明了一个外部的事务,就已经存在一个事务了,在 propagation 值为默认的 REQUIRED 的情况下, regCourse() 就会加入到已有的事务中,两个方法共用一个事务。
我们再来看下 Spring 事务处理的核心,其关键实现参考 TransactionAspectSupport.invokeWithinTransaction():
protected Object invokeWithinTransaction(Method method, @Nullable Class<?> targetClass,
      final InvocationCallback invocation) throws Throwable {

   TransactionAttributeSource tas = getTransactionAttributeSource();
   final TransactionAttribute txAttr = (tas != null ? tas.getTransactionAttribute(method, targetClass) : null);
   final PlatformTransactionManager tm = determineTransactionManager(txAttr);
   final String joinpointIdentification = methodIdentification(method, targetClass, txAttr);
   if (txAttr == null || !(tm instanceof CallbackPreferringPlatformTransactionManager)) {
      // 是否需要创建一个事务
      TransactionInfo txInfo = createTransactionIfNecessary(tm, txAttr, joinpointIdentification);
      Object retVal = null;
      try {
         // 调用具体的业务方法
         retVal = invocation.proceedWithInvocation();
      }
      catch (Throwable ex) {
         // 当发生异常时进行处理
         completeTransactionAfterThrowing(txInfo, ex);
         throw ex;
      }
      finally {
         cleanupTransactionInfo(txInfo);
      }
      // 正常返回时提交事务
      commitTransactionAfterReturning(txInfo);
      return retVal;
   }
   //......省略非关键代码.....
}
整个方法完成了事务的一整套处理逻辑,如下:
-
检查是否需要创建事务;
-
调用具体的业务方法进行处理;
-
提交事务;
-
处理异常。
这里要格外注意的是,当前案例是两个事务嵌套的场景,外层事务 doSaveStudent() 和内层事务 regCourse(),每个事务都会调用到这个方法。所以,这个方法会被调用两次。下面我们来具体来看下内层事务对异常的处理。
当捕获了异常,会调用 TransactionAspectSupport.completeTransactionAfterThrowing() 进行异常处理:
protected void completeTransactionAfterThrowing(@Nullable TransactionInfo txInfo, Throwable ex) {
   if (txInfo != null && txInfo.getTransactionStatus() != null) {
      if (txInfo.transactionAttribute != null && txInfo.transactionAttribute.rollbackOn(ex)) {
         try {
            txInfo.getTransactionManager().rollback(txInfo.getTransactionStatus());
         }
         catch (TransactionSystemException ex2) {
            logger.error("Application exception overridden by rollback exception", ex);
            ex2.initApplicationException(ex);
            throw ex2;
         }
         catch (RuntimeException | Error ex2) {
            logger.error("Application exception overridden by rollback exception", ex);
            throw ex2;
         }
      }
      //......省略非关键代码.....
   }
}
在这个方法里,我们对异常类型做了一些检查,当符合声明中的定义后,执行了具体的 rollback 操作,这个操作是通过 TransactionManager.rollback() 完成的:
public final void rollback(TransactionStatus status) throws TransactionException {
   if (status.isCompleted()) {
      throw new IllegalTransactionStateException(
            "Transaction is already completed - do not call commit or rollback more than once per transaction");
   }
   DefaultTransactionStatus defStatus = (DefaultTransactionStatus) status;
   processRollback(defStatus, false);
}
而 rollback() 是在 AbstractPlatformTransactionManager 中实现的,继续调用了 processRollback():
private void processRollback(DefaultTransactionStatus status, boolean unexpected) {
   try {
      boolean unexpectedRollback = unexpected;
      if (status.hasSavepoint()) {
         // 有保存点
         status.rollbackToHeldSavepoint();
      }
      else if (status.isNewTransaction()) {
         // 是否为一个新的事务
         doRollback(status);
      }
      else {
        // 处于一个更大的事务中
        if (status.hasTransaction()) {
           // 分支1
           if (status.isLocalRollbackOnly() || isGlobalRollbackOnParticipationFailure()) {
              doSetRollbackOnly(status);
           }
        }
        if (!isFailEarlyOnGlobalRollbackOnly()) {
           unexpectedRollback = false;
        }
      }
      // 省略非关键代码
      if (unexpectedRollback) {
         throw new UnexpectedRollbackException(
               "Transaction rolled back because it has been marked as rollback-only");
      }
   }
   finally {
      cleanupAfterCompletion(status);
   }
}
这个方法里区分了三种不同类型的情况:
-
是否有保存点;
-
是否为一个新的事务;
-
是否处于一个更大的事务中。
在这里,因为我们用的是默认的传播类型 REQUIRED,嵌套的事务并没有开启一个新的事务,所以在这种情况下,当前事务是处于一个更大的事务中,所以会走到情况 3 分支 1 的代码块下。
这里有两个判断条件来确定是否设置为仅回滚:
if (status.isLocalRollbackOnly() || isGlobalRollbackOnParticipationFailure())
满足任何一个,都会执行 doSetRollbackOnly() 操作。isLocalRollbackOnly 在当前的情况下是 false,所以是否分设置为仅回滚就由 isGlobalRollbackOnParticipationFailure() 这个方法来决定了,其默认值为 true, 即是否回滚交由外层事务统一决定 。
显然这里的条件得到了满足,从而执行 doSetRollbackOnly:
protected void doSetRollbackOnly(DefaultTransactionStatus status) {
   DataSourceTransactionObject txObject = (DataSourceTransactionObject) status.getTransaction();
   txObject.setRollbackOnly();
}
以及最终调用到的 DataSourceTransactionObject 中的 setRollbackOnly():
public void setRollbackOnly() {
   getConnectionHolder().setRollbackOnly();
}
到这一步,内层事务的操作基本执行完毕,它处理了异常,并最终调用到了 DataSourceTransactionObject 中的 setRollbackOnly()。
接下来,我们来看外层事务。因为在外层事务中,我们自己的代码捕获了内层抛出来的异常,所以这个异常不会继续往上抛,最后的事务会在 TransactionAspectSupport.invokeWithinTransaction() 中的 commitTransactionAfterReturning() 中进行处理:
protected void commitTransactionAfterReturning(@Nullable TransactionInfo txInfo) {
   if (txInfo != null && txInfo.getTransactionStatus() != null) {     txInfo.getTransactionManager().commit(txInfo.getTransactionStatus());
   }
}
在这个方法里我们执行了 commit 操作,代码如下:
public final void commit(TransactionStatus status) throws TransactionException {
   //......省略非关键代码.....
   if (!shouldCommitOnGlobalRollbackOnly() && defStatus.isGlobalRollbackOnly()) {
      processRollback(defStatus, true);
      return;
   }
   processCommit(defStatus);
}
在 AbstractPlatformTransactionManager.commit() 中,当满足了 shouldCommitOnGlobalRollbackOnly() 和 defStatus.isGlobalRollbackOnly(),就会回滚,否则会继续提交事务。其中 shouldCommitOnGlobalRollbackOnly() 的作用为,如果发现了事务被标记了全局回滚,并且在发生了全局回滚的情况下,判断是否应该提交事务,这个方法的默认实现是返回了 false,这里我们不需要关注它,继续查看 isGlobalRollbackOnly() 的实现:
public boolean isGlobalRollbackOnly() {
   return ((this.transaction instanceof SmartTransactionObject) &&
         ((SmartTransactionObject) this.transaction).isRollbackOnly());
}
这个方法最终进入了 DataSourceTransactionObject 类中的 isRollbackOnly():
public boolean isRollbackOnly() {
   return getConnectionHolder().isRollbackOnly();
}
现在让我们再次回顾一下之前的内部事务处理结果,其最终调用到的是 DataSourceTransactionObject 中的 setRollbackOnly():
public void setRollbackOnly() {
   getConnectionHolder().setRollbackOnly();
}
isRollbackOnly() 和 setRollbackOnly() 这两个方法的执行本质都是对 ConnectionHolder 中 rollbackOnly 属性标志位的存取,而 ConnectionHolder 则存在于 DefaultTransactionStatus 类实例的 transaction 属性之中。
至此,答案基本浮出水面了,我们把整个逻辑串在一起就是:外层事务是否回滚的关键,最终取决于 DataSourceTransactionObject 类中的 isRollbackOnly(),而该方法的返回值,正是我们在内层异常的时候设置的。
所以最终外层事务也被回滚了,从而在控制台中打印出异常信息:"Transaction rolled back because it has been marked as rollback-only"。
所以到这里,问题也就清楚了,Spring 默认的事务传播属性为 REQUIRED,如我们之前介绍的,它的含义是:如果本来有事务,则加入该事务,如果没有事务,则创建新的事务,因而内外两层事务都处于同一个事务中。所以,当我们在 regCourse() 中抛出异常,并触发了回滚操作时,这个回滚会进一步传播,从而把 saveStudent() 也回滚了。最终导致整个事务都被回滚了。
问题修正
从上述案例解析中,我们了解到,Spring 在处理事务过程中,有个默认的传播属性 REQUIRED,在整个事务的调用链上,任何一个环节抛出的异常都会导致全局回滚。
知道了这个结论,修改方法也就很简单了,我们只需要对传播属性进行修改,把类型改成 REQUIRES_NEW 就可以了。于是这部分代码就修改成这样:
@Transactional(rollbackFor = Exception.class, propagation = Propagation.REQUIRES_NEW)
public void regCourse(int studentId) throws Exception {
    studentCourseMapper.saveStudentCourse(studentId, 1);
    courseMapper.addCourseNumber(1);
    throw new Exception("注册失败");
}
运行一下看看:
java.lang.Exception: 注册失败
  at com.spring.puzzle.others.transaction.example3.CourseService.regCourse(CourseService.java:22)
异常正常抛出,注册课程部分的数据没有保存,但是学生还是正常注册成功。这意味着此时 Spring 只对注册课程这部分的数据进行了回滚,并没有传播到上一级。
这里我简单解释下这个过程:
当子事务声明为 Propagation.REQUIRES_NEW 时,在 TransactionAspectSupport.invokeWithinTransaction() 中调用 createTransactionIfNecessary() 就会创建一个新的事务,独立于外层事务。
而在 AbstractPlatformTransactionManager.processRollback() 进行 rollback 处理时,因为 status.isNewTransaction() 会因为它处于一个新的事务中而返回 true,所以它走入到了另一个分支,执行了 doRollback() 操作,让这个子事务单独回滚,不会影响到主事务。
至此,这个问题得到了很好的解决。
案例 2:多数据源间切换之谜
在前面的案例中,我们完成了学生注册功能和课程注册功能。假设新需求又来了,每个学生注册的时候,需要给他们发一张校园卡,并给校园卡里充入 50 元钱。但是这个校园卡管理系统是一个第三方系统,使用的是另一套数据库,这样我们就需要在一个事务中同时操作两个数据库。
第三方的 Card 表如下:
CREATE TABLE `card` (
  `id` int(11) NOT NULL AUTO_INCREMENT,
  `student_id` int(11) DEFAULT NULL,
  `balance` int(11) DEFAULT NULL,
  PRIMARY KEY (`id`)
) ENGINE=InnoDB DEFAULT CHARSET=utf8;
对应的 Card 对象如下:
public class Card {
    private Integer id;
    private Integer studentId;
    private Integer balance;
    //省略 Get/Set 方法
}
对应的 Mapper 接口如下,里面包含了一个 saveCard 的 insert 语句,用于创建一条校园卡记录:
@Mapper
public interface CardMapper {
    @Insert("INSERT INTO `card`(`student_id`, `balance`) VALUES (#{studentId}, #{balance})")
    @Options(useGeneratedKeys = true, keyProperty = "id")
    int saveCard(Card card);
}
Card 的业务类如下,里面实现了卡与学生 ID 关联,以及充入 50 元的操作:
@Service
public class CardService {
    @Autowired
    private CardMapper cardMapper;
    @Transactional
    public void createCard(int studentId) throws Exception {
        Card card = new Card();
        card.setStudentId(studentId);
        card.setBalance(50);
        cardMapper.saveCard(card);
    }
}
案例解析
这是一个相对常见的需求,学生注册和发卡都要在一个事务里完成,但是我们都默认只会连一个数据源,之前我们一直连的都是学生信息这个数据源,在这里,我们还需要对校园卡的数据源进行操作。于是,我们需要在一个事务里完成对两个数据源的操作,该如何实现这样的功能呢?
我们继续从 Spring 的源码中寻找答案。在 Spring 里有这样一个抽象类 AbstractRoutingDataSource,这个类相当于 DataSource 的路由中介,在运行时根据某种 key 值来动态切换到所需的 DataSource 上。通过实现这个类就可以实现我们期望的动态数据源切换。
这里强调一下,这个类里有这么几个关键属性:
-
targetDataSources 保存了 key 和数据库连接的映射关系;
-
defaultTargetDataSource 标识默认的连接;
-
resolvedDataSources 存储数据库标识和数据源的映射关系。
public abstract class AbstractRoutingDataSource extends AbstractDataSource implements InitializingBean {
   @Nullable
   private Map<Object, Object> targetDataSources;
   @Nullable
   private Object defaultTargetDataSource;
   private boolean lenientFallback = true;
   private DataSourceLookup dataSourceLookup = new JndiDataSourceLookup();
   @Nullable
   private Map<Object, DataSource> resolvedDataSources;
   @Nullable
   private DataSource resolvedDefaultDataSource;

   //省略非关键代码
}
AbstractRoutingDataSource 实现了 InitializingBean 接口,并覆写了 afterPropertiesSet()。该方法会在初始化 Bean 的时候执行,将多个 DataSource 初始化到 resolvedDataSources。这里的 targetDataSources 属性存储了将要切换的多数据源 Bean 信息。
@Override
public void afterPropertiesSet() {
   if (this.targetDataSources == null) {
      throw new IllegalArgumentException("Property 'targetDataSources' is required");
   }
   this.resolvedDataSources = new HashMap<>(this.targetDataSources.size());
   this.targetDataSources.forEach((key, value) -> {
      Object lookupKey = resolveSpecifiedLookupKey(key);
      DataSource dataSource = resolveSpecifiedDataSource(value);
      this.resolvedDataSources.put(lookupKey, dataSource);
   });
   if (this.defaultTargetDataSource != null) {
      this.resolvedDefaultDataSource = resolveSpecifiedDataSource(this.defaultTargetDataSource);
   }
}
获取数据库连接的是 getConnection(),它调用了 determineTargetDataSource() 来创建连接:
@Override
public Connection getConnection() throws SQLException {
   return determineTargetDataSource().getConnection();
}
@Override
public Connection getConnection(String username, String password) throws SQLException {
   return determineTargetDataSource().getConnection(username, password);
}
determineTargetDataSource() 是整个部分的核心,它的作用就是动态切换数据源。有多少个数据源,就存多少个数据源在 targetDataSources 中。
targetDataSources 是一个 Map 类型的属性,key 表示每个数据源的名字,value 对应的是每个数据源 DataSource。
protected DataSource determineTargetDataSource() {
   Assert.notNull(this.resolvedDataSources, "DataSource router not initialized");
   Object lookupKey = determineCurrentLookupKey();
   DataSource dataSource = this.resolvedDataSources.get(lookupKey);
   if (dataSource == null && (this.lenientFallback || lookupKey == null)) {
      dataSource = this.resolvedDefaultDataSource;
   }
   if (dataSource == null) {
      throw new IllegalStateException("Cannot determine target DataSource for lookup key [" + lookupKey + "]");
   }
   return dataSource;
}
而选择哪个数据源又是由 determineCurrentLookupKey() 来决定的,此方法是抽象方法,需要我们继承 AbstractRoutingDataSource 抽象类来重写此方法。该方法返回一个 key,该 key 是 Bean 中的 beanName,并赋值给 lookupKey,由此 key 可以通过 resolvedDataSources 属性的键来获取对应的 DataSource 值,从而达到数据源切换的效果。
protected abstract Object determineCurrentLookupKey();这样看来,这个方法的实现就得由我们完成了。接下来我们将会完成一系列相关的代码,解决这个问题。
问题修正
首先,我们创建一个 MyDataSource 类,继承了 AbstractRoutingDataSource,并覆写了 determineCurrentLookupKey():
public class MyDataSource extends AbstractRoutingDataSource {
    private static final ThreadLocal<String> key = new ThreadLocal<String>();
    @Override
    protected Object determineCurrentLookupKey() {
        return key.get();
    }
    public static void setDataSource(String dataSource) {
        key.set(dataSource);
    }
    public static String getDatasource() {
        return key.get();
    }
    public static void clearDataSource() {
        key.remove();
    }
}
其次,我们需要修改 JdbcConfig。这里我新写了一个 dataSource,将原来的 dataSource 改成 dataSourceCore,再将新定义的 dataSourceCore 和 dataSourceCard 放进一个 Map,对应的 key 分别是 core 和 card,并把 Map 赋值给 setTargetDataSources
public class JdbcConfig {
    //省略非关键代码
    @Value("${card.driver}")
    private String cardDriver;
    @Value("${card.url}")
    private String cardUrl;
    @Value("${card.username}")
    private String cardUsername;
    @Value("${card.password}")
    private String cardPassword;
    @Autowired
    @Qualifier("dataSourceCard")
    private DataSource dataSourceCard;
    @Autowired
    @Qualifier("dataSourceCore")
    private DataSource dataSourceCore;
    //省略非关键代码
    @Bean(name = "dataSourceCore")
    public DataSource createCoreDataSource() {
        DriverManagerDataSource ds = new DriverManagerDataSource();
        ds.setDriverClassName(driver);
        ds.setUrl(url);
        ds.setUsername(username);
        ds.setPassword(password);
        return ds;
    }
    @Bean(name = "dataSourceCard")
    public DataSource createCardDataSource() {
        DriverManagerDataSource ds = new DriverManagerDataSource();
        ds.setDriverClassName(cardDriver);
        ds.setUrl(cardUrl);
        ds.setUsername(cardUsername);
        ds.setPassword(cardPassword);
        return ds;
    }
    @Bean(name = "dataSource")
    public MyDataSource createDataSource() {
        MyDataSource myDataSource = new MyDataSource();
        Map<Object, Object> map = new HashMap<>();
        map.put("core", dataSourceCore);
        map.put("card", dataSourceCard);
        myDataSource.setTargetDataSources(map);
        myDataSource.setDefaultTargetDataSource(dataSourceCore);
        return myDataSource;
    }
    //省略非关键代码
}
最后还剩下一个问题,setDataSource 这个方法什么时候执行呢?
我们可以用 Spring AOP 来设置,把配置的数据源类型都设置成注解标签, Service 层中在切换数据源的方法上加上注解标签,就会调用相应的方法切换数据源。
我们定义了一个新的注解 @DataSource,可以直接加在 Service() 上,实现数据库切换:
@Documented
@Target({ElementType.TYPE, ElementType.METHOD})
@Retention(RetentionPolicy.RUNTIME)
public @interface DataSource {
    String value();
    String core = "core";
    String card = "card";
}
声明方法如下:
@DataSource(DataSource.card)另外,我们还需要写一个 Spring AOP 来对相应的服务方法进行拦截,完成数据源的切换操作。特别要注意的是,这里要加上一个 @Order(1) 标记它的初始化顺序。这个 Order 值一定要比事务的 AOP 切面的值小,这样可以获得更高的优先级,否则自动切换数据源将会失效。
@Aspect
@Service
@Order(1)
public class DataSourceSwitch {
    @Around("execution(* com.spring.puzzle.others.transaction.example3.CardService.*(..))")
    public void around(ProceedingJoinPoint point) throws Throwable {
        Signature signature = point.getSignature();
        MethodSignature methodSignature = (MethodSignature) signature;
        Method method = methodSignature.getMethod();
        if (method.isAnnotationPresent(DataSource.class)) {
            DataSource dataSource = method.getAnnotation(DataSource.class);
            MyDataSource.setDataSource(dataSource.value());
            System.out.println("数据源切换至:" + MyDataSource.getDatasource());
        }
        point.proceed();
        MyDataSource.clearDataSource();
        System.out.println("数据源已移除!");
    }
}
最后,我们实现了 Card 的发卡逻辑,在方法前声明了切换数据库:
@Service
public class CardService {
    @Autowired
    private CardMapper cardMapper;
    @Transactional(propagation = Propagation.REQUIRES_NEW)
    @DataSource(DataSource.card)
    public void createCard(int studentId) throws Exception {
        Card card = new Card();
        card.setStudentId(studentId);
        card.setBalance(50);
        cardMapper.saveCard(card);
    }
}
并在 saveStudent() 里调用了发卡逻辑:
@Transactional(rollbackFor = Exception.class)
public void saveStudent(String realname) throws Exception {
    Student student = new Student();
    student.setRealname(realname);
    studentService.doSaveStudent(student);
    try {
        courseService.regCourse(student.getId());
        cardService.createCard(student.getId());
    } catch (Exception e) {
        e.printStackTrace();
    }
}
执行一下,一切正常,两个库的数据都可以正常保存了。
最后我们来看一下整个过程的调用栈,重新过一遍流程(这里我略去了不重要的部分)。
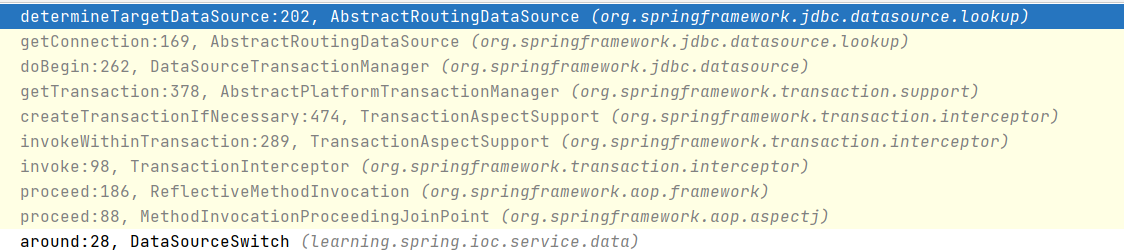
在创建了事务以后,会通过 DataSourceTransactionManager.doBegin() 获取相应的数据库连接:
protected void doBegin(Object transaction, TransactionDefinition definition) {
   DataSourceTransactionObject txObject = (DataSourceTransactionObject) transaction;
   Connection con = null;
   try {
      if (!txObject.hasConnectionHolder() ||
txObject.getConnectionHolder().isSynchronizedWithTransaction()) {
         Connection newCon = obtainDataSource().getConnection();
         txObject.setConnectionHolder(new ConnectionHolder(newCon), true);
      }
      //省略非关键代码
}
这里的 obtainDataSource().getConnection() 调用到了 AbstractRoutingDataSource.getConnection(),这就与我们实现的功能顺利会师了。
public Connection getConnection() throws SQLException {
   return determineTargetDataSource().getConnection();
}
重点回顾
通过以上两个案例,相信你对 Spring 的事务机制已经有了深刻的认识,最后总结下重点:
Spring 在事务处理中有一个很重要的属性 Propagation,主要用来配置当前需要执行的方法如何使用事务,以及与其它事务之间的关系。
Spring 默认的传播属性是 REQUIRED,在有事务状态下执行,如果当前没有事务,则创建新的事务;
Spring 事务是可以对多个数据源生效,它提供了一个抽象类 AbstractRoutingDataSource,通过实现这个抽象类,我们可以实现自定义的数据库切换。
思考题
结合案例 2,请你思考这样一个问题:在这个案例中,我们在 CardService 类方法上声明了这样的事务传播属性,@Transactional(propagation = Propagation.REQUIRES_NEW),如果使用 Spring 的默认声明行不行,为什么?
留言